# 快速上手 - 安装步骤
友情提醒:
在对接自己的项目之前,建议先下载 vk-uni-pay 的示例项目,先将示例项目跑通之后再来对接你自己的项目。
点击查看示例项目运行教程 (opens new window)
如果你已经跑通了示例项目,则继续往下看!
# 1、 下载安装
1、从插件市场安装(购买)
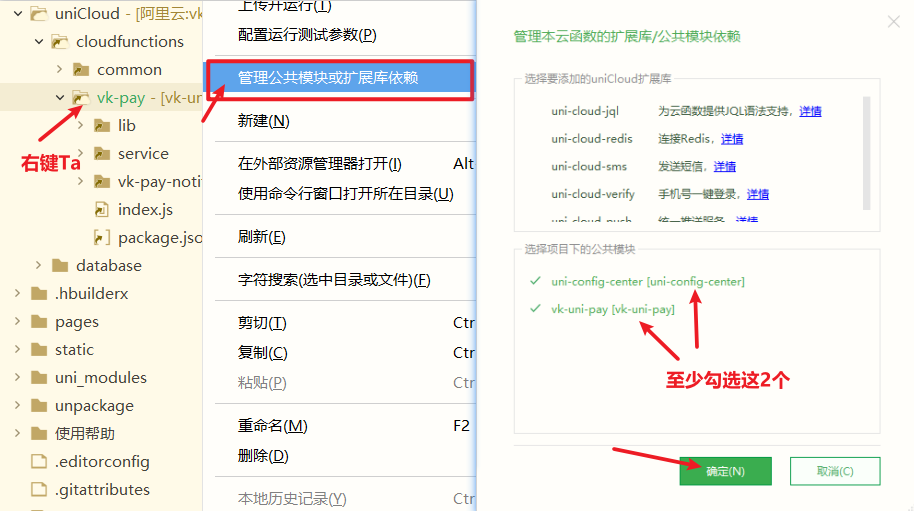
vk-uni-pay插件到你的项目中。插件市场传送门 (opens new window)2、在需要引入支付 API 的云函数右键选择
管理公共模块依赖菜单,至少引入这 2 个模块uni-config-center、vk-uni-pay
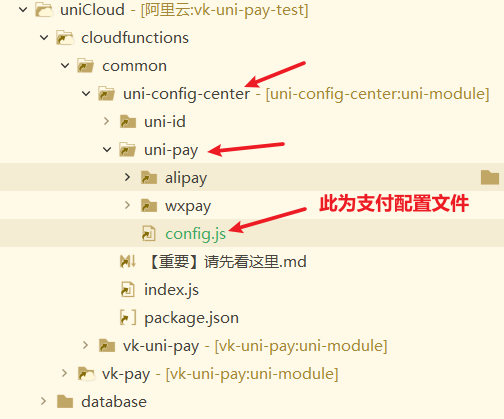
- 3、配置支付参数文件地址:
uniCloud/cloudfunctions/common/uni-config-center/uni-pay/config.js(没有则新建,或从示例项目中复制)(注意这里是config.js) 查看支付参数
- 4、从支付示例项目中 复制
使用帮助/vk-pay云函数示例代码/service/目录内的所有文件粘贴到 你的项目的uniCloud/cloudfunctions/vk-pay/service/目录(没有目录则新建)(注意: 插件本身不带这些文件,在示例项目中)

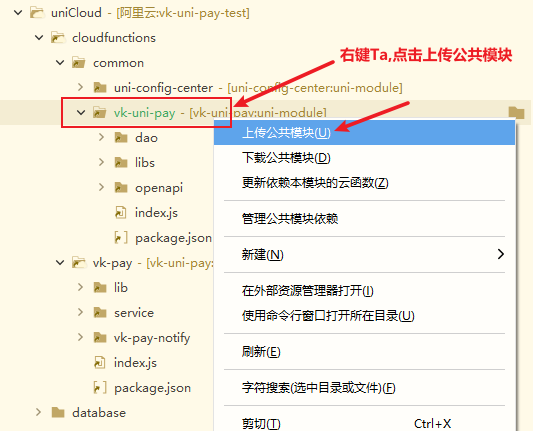
- 5、上传公共模块
vk-uni-pay(右键,上传公共模块)
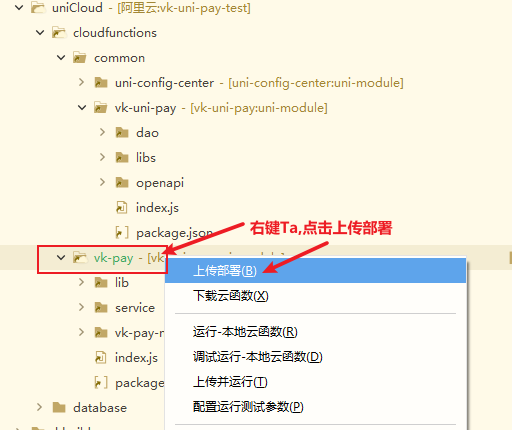
- 6、上传云函数
vk-pay(右键,上传云函数)
- 7、完成
# 特别注意
由于退款接口和转账接口涉及资金损失,故请在调试通后,删除
vk-pay/service/pay/refund.js
vk-pay/service/pay/transfer.js
这 2 个文件,退款和转账相关代码应该写在你自己的业务函数中,且需要严格判断权限。
如:退款金额不可以超过订单付款订单,发起退款的人必须是订单下单人或管理员等等。
# 2、 配置 uni-id 里的小程序参数
因为小程序支付需要获取用户 openid(故需要配置 uni-id)
如果你不使用微信小程序支付,则直接跳过第二步
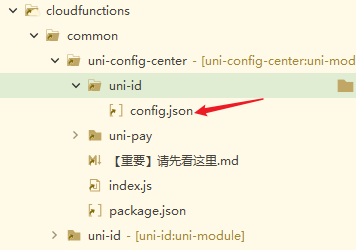
- 打开文件
cloudfunctions/common/uni-config-center/uni-id/config.json(没有则新建)(注意这里是config.json)
微信小程序支付时需要获取 openId ,故需要配置 mp-weixin
支付宝小程序支付时需要获取 openId ,故需要配置 mp-alipay
- 完整的 uni-id 配置代码如下
{
  "passwordSecret": "passwordSecret-demo",
  "tokenSecret": "tokenSecret-demo",
  "tokenExpiresIn": 7200,
  "tokenExpiresThreshold": 600,
  "passwordErrorLimit": 6,
  "bindTokenToDevice": false,
  "passwordErrorRetryTime": 3600,
  "autoSetInviteCode": true,
  "forceInviteCode": false,
  "app-plus": {
    "tokenExpiresIn": 2592000,
    "oauth": {
      "weixin": {
        "appid": "weixin appid",
        "appsecret": "weixin appsecret"
      },
      "apple": {
        "bundleId": "your APP bundleId"
      }
    }
  },
  "mp-weixin": {
    "oauth": {
      "weixin": {
        "appid": "weixin appid",
        "appsecret": "weixin appsecret"
      }
    }
  },
  "mp-alipay": {
    "oauth": {
      "alipay": {
        "appid": "alipay appid",
        "privateKey": "alipay privateKey"
      }
    }
  },
  "service": {
    "sms": {
      "name": "DCloud",
      "codeExpiresIn": 300,
      "smsKey": "your sms key",
      "smsSecret": "your sms secret"
    },
    "univerify": {
      "appid": "your appid",
      "apiKey": "your apiKey",
      "apiSecret": "your apiSecret"
    }
  }
}
1
2
3
4
5
6
7
8
9
10
11
12
13
14
15
16
17
18
19
20
21
22
23
24
25
26
27
28
29
30
31
32
33
34
35
36
37
38
39
40
41
42
43
44
45
46
47
48
49
50
51
52
2
3
4
5
6
7
8
9
10
11
12
13
14
15
16
17
18
19
20
21
22
23
24
25
26
27
28
29
30
31
32
33
34
35
36
37
38
39
40
41
42
43
44
45
46
47
48
49
50
51
52
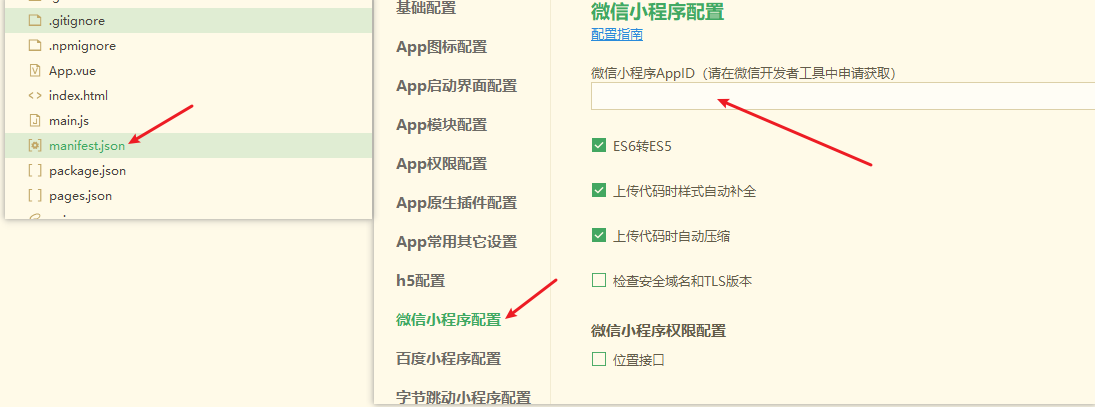
- 配置完后,还需要到项目根目录的
manifest.json文件中再次配置一下微信小程序的appid,如下图所示