# IOS 内购支付
vk-pay 的版本需 >= 1.10.0
# 配置
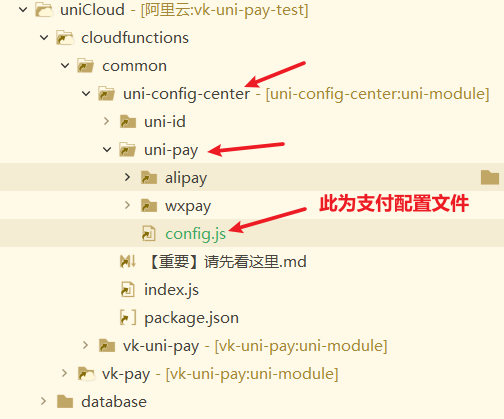
对应支付配置的节点是 appleiap.app-plus
const fs = require('fs');
const path = require('path');
module.exports = {
  /**
   * 统一支付回调地址,格式为 "服务空间SpaceID":"URL化完整地址"
   * 这里的本地开发并不是指 http://localhost:8080/ 的地址,而是另外一个服务空间的ULR化地址(如果你本地开发和线上环境共用同一个服务空间则只需要填线上环境的即可)
   * 回调的云函数地址,建议填 /http/vk-pay,因为vk-pay云函数已经写好了回调处理的逻辑,否则你需要自己写全部的回调逻辑。
   * 其中vk-pay是可以改名的,只需要修改 uniCloud/cloudfunctions/vk-pay/package.json 文件中的 "path": "/http/vk-pay", 把 /http/vk-pay 改成 /http/xxxx 即可(需要重新上传云函数vk-pay)。
   */
  notifyUrl: {
    // 本地开发环境,如果你本地开发和线上环境共用同一个服务空间则只需要填线上环境的即可
    'mp-22d55e33-c2f3-22b4-55fc-7b33a6144e22': 'https://fc-mp-22d55e33-c2f3-22b4-55fc-7b33a6144e22.next.bspapp.com/http/vk-pay',
    // 线上正式环境
    'mp-6666d886-00b6-22b2-9156-84afeadcf669': 'https://fc-mp-6666d886-00b6-22b2-9156-84afeadcf669.next.bspapp.com/http/vk-pay',
  },
  // ios内购相关
  appleiap: {
    // ios内购支付
    'app-plus': {
      password: '', // 非自动续订场景不需要此参数
      timeout: 10000, // 请求超时时间,单位:毫秒
      receiptExpiresIn: 86400, // ios内购凭据有效期,单位:秒 86400 = 24小时 3600 = 1小时
      sandbox: true, // 是否是沙箱环境(正式上线时必须配置为false)
    },
  },
};
1
2
3
4
5
6
7
8
9
10
11
12
13
14
15
16
17
18
19
20
21
22
23
24
25
26
2
3
4
5
6
7
8
9
10
11
12
13
14
15
16
17
18
19
20
21
22
23
24
25
26
# 示例代码
下面的代码中,只需要把 productList 变量内的值替换成你自己的商品信息即可。
<template>
  <view class="content">
    <view class="uni-list">
      <radio-group @change="applePriceChange">
        <label class="uni-list-cell" v-for="(item, index) in productList" :key="index">
          <radio :value="item.productid" :checked="item.checked" />
          <view class="price">{{ item.title }} {{ item.price }}元</view>
        </label>
      </radio-group>
    </view>
    <view class="uni-padding-wrap"><button class="btn-pay" @click="createPayment" :disabled="disabled">立即支付</button></view>

    <!-- 统一支付组件 -->
    <vk-uni-pay ref="vkPay" :query-payment-action="vkPay.queryPaymentAction" :pay-order-info="vkPay.payOrderInfo" :debug="true" @init="init"></vk-uni-pay>
  </view>
</template>

<script>
  export default {
    data() {
      return {
        vkPay: {
          /**
           * 查询支付状态的云函数配置
           * 如果是非路由框架,则action为字符串,值为云函数名称
           * 如果是路由框架,则按下方配置填写
           * 注意:queryPaymentAction内参数用默认即可,无需更改。(除非你已经知道参数的意义)
           */
          queryPaymentAction: {
            name: 'vk-pay', // 云函数名称
            action: 'pay/queryPayment', // 路由模式下云函数地址
            actionKey: 'action', // 路由模式下云函数地址的识别key
            dataKey: 'data', // 路由模式下云函数请求参数的识别key
          },
          // 支付成功后,是否需要返回支付订单数据(为false可以加快支付成功后的响应速度)
          payOrderInfo: false,
        },
        // 表单请求数据
        form1: {
          provider: 'appleiap', // 固定appleiap
          out_trade_no: '', // 订单号
          productid: '', // 用户选择的商品id
          type: 'appleiap', // 支付回调类型(可自定义)
        },
        disabled: true, // 支付按钮是否禁用
        // 出售的ios内购商品列表(productid需要在ios开发者后台获取)
        productList: [
          {
            description: '商品A的描述',
            price: 1,
            productid: '商品A在ios后台的id',
            title: '赞赏',
          },
          {
            description: '商品B的描述',
            price: 6,
            productid: '商品B在ios后台的id',
            title: '赞赏',
          },
        ],
      };
    },
    onLoad() {},
    onShow() {},
    onUnload() {},
    methods: {
      // 初始化
      async init() {
        this.productList[0].checked = true;
        this.form1.productid = this.productList[0].productid;
        this.disabled = false;
        // #ifdef APP-PLUS
        if (this.$refs.vkPay && this.$refs.vkPay.appleiapRestore) {
          // ios内购支付漏单重试
          await this.$refs.vkPay.appleiapRestore();
        }
        // #endif
      },
      /**
       * 发起支付
       * 在调用此api前,你应该先创建自己的业务系统订单,并获得订单号 out_trade_no,而示例中为了简化跟支付插件无关的代码,这里直接已时间戳生成了out_trade_no
       */
      createPayment(obj = {}) {
        // #ifndef APP-PLUS
        this.toast('请在app环境内发起支付', 'none');
        // #endif
        let { form1 } = this;
        form1.out_trade_no = obj.out_trade_no || 'test_' + Date.now();
        // 发起支付
        this.$refs.vkPay.createPayment({
          // 如果是非路由框架,则外层action不再是json,而为字符串,值为云函数名称,如 action: "你的云函数名称"
          // 如果是路由框架,则按下方配置填写
          // 如果云函数为 vk-pay,则无需改动 action
          action: {
            name: 'vk-pay', // 云函数名称
            action: 'pay/createPayment', // 路由模式下云函数地址
            actionKey: 'action', // 路由模式下云函数地址的识别key(注意VK路由框架下,此值为$url)
            dataKey: 'data', // 路由模式下云函数请求参数的识别key
          },
          // 请求数据(data内的参数会传给云函数,云函数中通过 data.xxx 的方式获取)
          data: {
            provider: form1.provider, // 支付供应商(这里固定为appleiap,代表ios内购支付)
            out_trade_no: form1.out_trade_no, // 插件支付单号
            productid: form1.productid, // ios内购产品id(仅ios内购生效)
            type: form1.type, // 支付回调类型(可自定义,建议填写appleiap)
          },
          // 成功回调
          success: (res) => {
            // 此处一般是写支付成功的提示或跳转到支付成功的页面。
            this.toast('支付成功', 'success');
            console.log('paySuccess', res);
          },
          // 失败回调
          fail: (res) => {
            if (res.failType === 'create') {
              // 创建支付失败时提示
              this.alert(res.msg);
            } else if (res.failType === 'request') {
              // 请求支付失败时提示
              this.toast('请求支付失败');
            } else if (res.failType === 'result') {
              // 支付结果失败时提示
              this.toast('支付失败');
            }
          },
          // 取消回调
          cancel: (res) => {
            this.toast('用户取消支付');
          },
        });
      },
      // 监听事件 - 支付成功
      onSuccess(res) {
        console.log('success: ', res);
        if (res.user_order_success) {
          // 代表用户已付款,且你自己写的回调成功并正确执行了
        } else {
          // 代表用户已付款,但你自己写的回调执行失败(通常是因为你的回调代码有问题)
        }
      },

      // 监听-多选框选中的值改变
      applePriceChange(e) {
        this.form1.productid = e.detail.value;
      },

      // uni.showToast的简易封装
      toast(title, icon = 'none', mask = false) {
        uni.showToast({
          title,
          icon,
          mask,
          duration: 1500,
        });
      },
      // uni.showModal的简易封装
      alert(content, title = '提示') {
        uni.showModal({
          title,
          content,
          showCancel: false,
        });
      },
    },
  };
</script>

<style lang="scss" scoped>
  .content {
    padding: 15px;
  }

  button {
    background-color: #007aff;
    color: #ffffff;
  }

  .uni-list-cell {
    display: flex;
    flex-direction: row;
    align-items: center;
    padding: 10px;
    border-bottom: 1px solid #eee;
  }

  .price {
    margin-left: 10px;
  }

  .btn-pay {
    margin-top: 30px;
  }
</style>
1
2
3
4
5
6
7
8
9
10
11
12
13
14
15
16
17
18
19
20
21
22
23
24
25
26
27
28
29
30
31
32
33
34
35
36
37
38
39
40
41
42
43
44
45
46
47
48
49
50
51
52
53
54
55
56
57
58
59
60
61
62
63
64
65
66
67
68
69
70
71
72
73
74
75
76
77
78
79
80
81
82
83
84
85
86
87
88
89
90
91
92
93
94
95
96
97
98
99
100
101
102
103
104
105
106
107
108
109
110
111
112
113
114
115
116
117
118
119
120
121
122
123
124
125
126
127
128
129
130
131
132
133
134
135
136
137
138
139
140
141
142
143
144
145
146
147
148
149
150
151
152
153
154
155
156
157
158
159
160
161
162
163
164
165
166
167
168
169
170
171
172
173
174
175
176
177
178
179
180
181
182
183
184
185
186
187
188
189
190
191
192
193
# 开通
- 登录App Store Connect (opens new window)签署《付费应用程序协议》
- 在 App Store Connect 中为 App 配置 App 内购买项目产品,参考创建 App 内购买项目 (opens new window),设置产品 ID(productId)
更多信息详见苹果官方文档 App 内购买项目配置流程 (opens new window)。
注意
- 提交 App Store 的 App 才能开通应用内支付,使用
苹果企业账号发布的 App 不能开通使用 - 根据 App Store 审核指南条款 3.1.1 (opens new window) 要求,虚拟物品交易必须使用应用内支付,实物交易才可使用第三方支付(支付宝、微信等)
- 创建 App 内购买项目的各项信息需要填写完整,保存后内购项目的状态是准备提交,当提交应用通过审核后,状态则变为已批准
- 正式上线前可在 Test Flight 平台添加 App Store Connect 用户,测试支付时可以使用此用户帐号
# 沙箱账号
- 登陆苹果开发者中心,添加沙箱账号
- 手机或 iPad 登陆沙箱账号,在 系统设置 -> App Store
# 注意事项
- ios 内购支付需勾选 App 模块配置中的 Apple 应用内支付,打开项目的 manifest.json 文件,在“App 模块配置”项的“Payment(支付)”下勾选“Apple 应用内支付”:
- 需要打 ios 自定义基座
- 需要注册 ios 开发者账号,且交了年费(688 元/年)
- 需要在 ios 开发者平台添加内购商品,并获得商品 id
- ios 沙箱测试时,需要先在 ios 开发者平台添加沙箱测试账号,同时你的测试手机上需要登录 ios 沙箱账号
- hbx 的热刷新可能会导致 ios 支付无法正常调用,如果发现无法调用了,需要先关闭手机 App,并删除手机上的 App 基座,然后 hbx 重启项目,再打开手机 App。